Search on this web:
Custom Search

Thursday, April 28, 2011

Noise Colours & Types

Certain noises are described by their colour, for example, the term "white noise" is common in audio production and other situations. Some of these names are official and technical, others have more loose definitions. These terms generally refer to random noise which may contain a bias towards a certain range of frequencies.

Black Noise A term with numerous conflicting definitions, but most commonly refers to silence with occasional spikes.

Blue Noise Contains more energy as the frequency increases.

Brown Noise Mimics the signal noise produced by brownian motion.

Gray Noise Similar to white noise, but has been filtered to make the sound level appear constant at all frequencies to the human ear.

Green Noise An unofficial term which can mean the mid-frequencies of white noise, or the "background noise of the world".

Orange Noise An unofficial term describing noise which has been stripped of harmonious frequencies.

Pink Noise Contains an equal sound pressure level in each octave band. Energy decreases as frequency increases.

Purple Noise Contains more energy as the frequency increases.

Red Noise An oceanographic term which describes ambient underwater noise from distant sources. Also another name for brown noise.

White Noise Contains an equal amount of energy in all frequency bands.

Note: Some of these definitions refer to "all frequencies". This is only theoretical — in practice this means "all frequencies in a finite range".

Wednesday, April 27, 2011

Best & most popular (DAW) Digital Audio Workstation Software of 2011

This could not have been very difficult as you can simply ask this question in the top recording forums or even start a poll/survey. But potential problem could be that forum users can be paid by the software company to promote their products by answering polls and post in forums. Bear in mind those users in the home recording/audio forums are not true representative of the entire DAW user population so the result are not entirely accurate.

Therefore, to find out the reality aside from doing a survey/polls/asking a question is to get it from the most reliable data source – Google trends and searches tool. Google Inc. takes care in providing the most accurate data as possible. The results are also worldwide so it’s pretty a good representative of the entire DAW user population.

The first thing I did is to list all the known DAW commercial software available in the market. I came up with these lists:

1.) Ableton Live
2.) Acid Pro
3.) Adobe Audition
4.) Apple Garageband
5.) Apple Logic
6.) Cakewalk Sonar
7.) Cockos Reaper
8.) Cubase
9.) FL Studio
10.) Magix Samplitude
11.) Magix Sequoia
12.) Mixcraft
13.) Nuendo
14.) Pro Tools
15.) Propellerhead Reason
16.) Reaper Cockos
17.) Sony Sound Forge

The next thing is to get their search volume in Google using this tool:
https://adwords.google.com/select/KeywordToolExternal.

This shows how many users are actually looking for this DAW in Google search engine. This is a monthly figure and the higher this number, the more popular is the DAW. Below is the result:


It’s surprising and sometimes hard to believe that FL Studio is the most popular DAW based on popularity by search volume. It overtakes Cubase, Adobe Audition and Ableton Live in terms of popularity. Personally, I didn’t expect FL Studio to be this popular. I don’t know exactly the reason. Maybe it’s due to its price, features, ease of use and popularity among hip hop producers which of course one of most popular type of music genre today. I always thought either Cubase or Pro tools command the DAW popularity because they already been there in the business for some time already. And also take note that Pro tools have been regarded as the industry standard in DAW (http://bit.ly/hgZutw). The above data also shows that the top 5 DAW hold approximately 80% of what the users are looking for (see the cumulative column).

So what happens basically in the past 7 years? How did this came to happen? You can take a look at the details by using Google trends: http://www.google.com/trends. Let’s plot and analyze the trend of the top 5 performing DAW (FL Studio, Cubase, Adobe Audition, Pro tools and Ableton Live):


Based on the data it clearly reveals that in the year 2004 to 2009, Cubase holds the DAW overall popularity and is the choice for most users. FL Studio at the time (in 2004) is still in the bottom of top 5. Protools and Cubase did hold a significant share in the popularity in year 2004 to 2009. But things happen really slowly, FL Studio continuously becoming popular starting in the year 2005 until now (as shown by the increasing popularity trend.).

Adobe Audition and Ableton Live has similar share in the user’s popularity. Sad to take note that Cubase popularity went down significantly in the last 7 years and it was overtaken by FL Studio and Protools sometime in the year 2010.

Conclusion and Recommendations: Does being popular also means it’s the best? It’s not true at all times. But another question is why FL Studio became so very popular? Why did Cubase popularity went down significantly in the last 7 years only to be overtaken by FL Studio? Some might answer because the price is lower which means it is very affordable. Some might answer because it is relatively easy to use and some will say they have great documentation and manuals as well as community support. Some will also testify that the features are complete for the very low price they paid (best bang for your buck). Or some users might also answer that FL Studio is a very light program and take very little amount of system resources to operate. Does this imply that FL Studio is now the best DAW software? You decide. Wait; let’s see what will happen in the next couple of years.

Tuesday, April 26, 2011

7 Common Recording Mistakes in Pro Home-based Music Production to Avoid

MISTAKE #1: Using onboard sound card when recording music to your computer

Onboard soundcard has lot of limitations that could prevent you from creating high quality recordings. It is because they have very low signal to noise ratio it means that the noise created will be substantial over the recordings. The second primary reason is that onboard card will not allow you to record at highest sampling rate/bit depth as possible which is crucial for professional sound recordings. Most onboard cards only support 16-bit/44.1Khz or 48Khz which is not optimum or recommended. The last reason is that they have limited connectivity; onboard card is designed not for professional music productions but for other less audio-intensive apps like gaming and chatting. So if you need to record two instruments simultaneously, you just can’t. Much worse if you are tracking/recording drums :) Instead; invest in high quality audio interfaces such as Tascam US1641 USB 2.0 Audio and MIDI interface


In this case, you really do not need a soundcard or an outboard audio mixer. All you need is an audio interface and connect it to your computer using USB 2.0 technology. They accept several inputs and is ideal for recording several instruments at once which includes drums. These audio interface cost around $300 dollars, so if you are on the very tight budget and plans to use a soundcard. You can start with M-audio Audiophile 2496 which allows recording at 24-bit/96Khz format and only cost $95.

MISTAKE #2: Using Computer/Laptop multimedia speakers for monitoring audio.

These speakers are not designed for professional audio monitoring. They do not have flat frequency response. As a result, you won’t be able to monitor the details and assess the quality of your recordings objectively. Common multimedia speakers such as Creative, Altec, etc are designed for gaming applications and not suited for serious music production. One of my most favorite entry level professional studio monitor is Yamaha HS80M Studio Reference Monitor:


Reference monitors allows you to assess the quality of your recordings accurately because they have a flatter frequency response compared to speakers designed for other applications. These are “powered” studio monitors under $500 and they have exceptionally flat frequency response.

MISTAKE #3: Not doing pre-production or recording production plan

If you are aiming to produce the best sounding album as possible, crucial planning is needed. You need to examine what musical instruments or instrumentation is needed to be added to the song to make it sound great. Test things in advance before recording the tracks. In this case, do some pre-production runs, let the band perform and experiment with different arrangements to decide what is good or not.

Then you make a plan and write it on a paper. Sequence your multitrack project in advance, so you will decide how many guitar tracks you need to record. How many vocal takes, back up vocal is needed. Or whether you need to hire violinist to fit the song, etc. Once you have completed that solid plan, then start the recording sesssion.

MISTAKE #4: Recording and Mixing in UN-treated room acoustics

Your room that you are recording or mixing has a HUGE impact on the results of your music production. In this case, you need to treat your room properly so that it won’t unncesssary bounce sound waves that could bias your mixing/recording decisions. You can read this tutorial on mixing studio setup acoustic design. This is more in-depth and complete tutorial on home studio acoustics that basically covers everything you need to learn.

MISTAKE #5: Recording everything in stereo

Some tracks will only be highly necessary to be recorded in stereo (such as a solo instrument). In a multitrack project, everything should be recorded in 24bit/96Khz mono since these tracks will be mixed and then summed up into a two-channel (left and right) signal known as stereo mixdown.

The file sizes are also less compared to a stereo signal. You can read this post on the advantages of recording mono compared to stereo.

MISTAKE #6: Do not have a “trained” ear

If you are working in a studio both as an engineer or a producer, it is a requirement that you have “trained” ear. Your ear is the most powerful studio equipment. This means you can spot out of tune recordings easily, perceive minor changes in volume level, changes in tempo, pitch, noise, etc. There is no overnight success formula to have this asset. Instead you need to trained your ear on a continual basis so that you can sort out what sounds good and what sounds bad. In this case, you need to undergo ear training development exercises for recording/mixing engineers. Do not forget to monitor at reasonable level because consistent loud volume can damage your ears in the long run.

MISTAKE #7: Not recording in high resolution

A common newbie mistake is to record at 16bit/44.1Khz. This is not optimal since mixing and mastering needs digital audio sampled at much higher rate such as 24bit/96Khz for best results. It offers a much higher signal to noise ratio and your recording sounds cleaner and with depth.

Monday, April 25, 2011

Tips in Mixing Electric Guitars using "Double Tracking" Technique


One of the key elements in rock mix is thick and heavy guitar sound. One of the effective ways to accomplish this sound in the mixing process is through a technique called as “Double Tracking”. In this post I will illustrate how to double track guitars in the mix with the objective of making it heavy and thick.

Bear in mind there a lot of ways to thicken the guitar sound. Double tracking is one of the easier ways. Alternatively you can do:
  1. Compression on guitars to make it sound thick.
  2. Applying effects such as maximizer to increase loudness.
  3. Parallel compression.
If the guitar sounds thin and weak, it will tend to affect the commercial appeal of the song especially if it is being marketed as a pure rock or alternative music. It is highly essential to mix things right but…

The following are the important requirement before you can double track the guitar in the mix:
Electric guitar photos

  • The recording of the guitar should be free of noise and normalize to the maximum volume.
  • If the guitar is recorded twice, it should also be clean and normalized. But it is not required to record it twice.
  • Record with the best distortion tone you need. Do not record it yet if you are not yet convinced of the distortion tone. Much better to experiment with a live band before starting to record the guitar. The overall purpose is to have a clean and final recording ready for mixing. Remember it is not advisable to fix the distortion tone in the mix; it makes the mixing process to be complicated.
  • Double check the tuning of the guitars, even slightly out of tune guitars can be problematic since if you double tracked it will tend to worsen the out of tune guitars.

It is also highly important particularly in the recent pop rock music trend to achieve not only thick guitar sound but it is also a wide guitar sound. This will achieve the “airy” sound of the distorted guitars.

So how do we start the mix?
  1. Start with placing the 1st track in the Track one of the mixing session.
  2. Place the other guitar track in the Track two of the mixing session. If you are recording only once, just copy and paste the wav file in the Track one to Track two.
  3. Pan the Track one to -75 units (left). Depending on your recording software, this could be in %, for example if the maximum left pan setting is 100% so it will be 75/100 or 75%.
  4. Pan the Track two to 75 units (right).
  5. Now to get that wide thick sound, you can apply 5ms delay to one of the guitar (either left or right) (mix 100%)
  6. To even make it heavier, do not anymore apply reverb on any of the tracks ( it is highly important that the reverb is from the room and amp based reverb that will be realized during the recording process). It is because if you start applying reverb on the guitar, it will tend to sound weak and far. Since you are mixing for rock, it is important to get the “in your face” guitar sound.
  7. EQ it properly, do not cut too much bass in the distorted guitar, it will help add the heaviness sound.
  8. Cut 1000Hz and 800 Hz on any guitar to make sound so clean and avoid the cracking sound.
  9. Adjust the track one and track two volume and stop when it is loud enough for the guitar tracks to be heard, not dominating the vocals.
  10. Cut 3000Hz with around -6dB and Q of 1.0 for both guitar tracks.
  11. If your effects are arrange serially below are the sequence of effects that will be placed in each guitar : 
    1. a. Parametric Equalizer
    2. b. Compressor
    3. c. Reverb (optional) necessary only if the guitar tracks is too dry.
    4. d. Delay (only on one track)
It is highly important to rely on your ears to do the settings. Do not believe in holy grail settings of compressor, EQ, they are there to serve as a guide and it is important to stick with the basic principles in double tracked mixing such as above.

Friday, April 22, 2011

Using Pan, Volume and effects

You have probably noticed on your mixer there is a "pan" control on nearly every channel. No, this does not refer to the frying pan the significant other menaced you with after your last trip to the gear store. Pan is short for "pan pot". And Pan Pot is short for Panoramic Potentiometer. (A potentiometer, by the way, is a fancy word for "knob".)

Panning is critical to the makeup of your stereo image. A stereo image has two basic perspectives, left to right and front to back. Pan pots control the left and right axis. Volume, reverb, delay, filtering and ambience create the front and back.


Simple Panning Tricks for Licks

In this day of totally staggering possibilities with plugins we often forget how powerful, and critical, the pan knob is to attaining an excellent stereo image. The main thing here is to keep instruments out of the way of each other so the listener can hear them clearly. Perhaps the most obvious example of this problem is with 2 electric guitars, particularly if distortion is used. Even using one will fill the audio bandwidth significantly, but two turns it quickly into a metal junkyard of cacophony. It will help immeasurably to pan these two so they are out of each other's way. Also make them take turns sometimes. But you'll see, if you try this, that panning about 30% will really help things.

The Image of the Band

Pretend you are in the audience. Where's the keyboard player? Always on the right. Or extreme left and right if there are two of them. The Drummer? Dead center. The Guitarists are usually at 10 and 2 o'clock, and the vocalist is dead center, in front of the drummer. Of course you have seen that a million and a half times. So set up your classic rock mix with that as a guide. Center the kick and snare, let the cymbals go a little to the side. If their is a conga player, put them on the left end. Use the pan controls to bring a focus to the perspective from the audience.

Front and Back

It may seem obvious, but we need to say it anyway. Instruments that we perceive to be closer are louder and have more of a direct, rather than reflected, sound. The elements of the mix that are important are up front and we hear them most clearly. Those in the back may have more early reflections infused into the main sound of the instrument. In your mix, you might create a reverb just for these early reflections that is separate from the main, hall reverb. Why is that? Consider being at a concert hall. The loud elements may bounce off the back wall and ceiling even though they are up front. Yet the softer instruments in the back may be imbued with reflections but very little of the sound energy may actually bounce off the back wall. Using 2 reverbs helps in this situation.

Creating a "longer" reverb.

An old trick is to first run signals through a digital delay, then to the reverb. We used to have to do this because digital reverb times were shorter than they are today, but the trick still works. In fact, it has been done on so many recordings that it is a bit of a standard. Its just the thing for ambient type soundcapes and may be used to mask imperfect vocal performances, as the delay tends to help mask off pitch notes.

Advanced Texture Mix Tip

Ever wonder why some mixes just jump out at you? It seems like the sound is deep and wide and almost 3 dimensional. There's a number of ways to achieve that, some good, some bad. The most dramatic is reversing the phase on one channel of a stereo mix. Sound just leaps out, but there is a problem. Sum to mono and the whole image disappears, what we know as phase cancellation. Another way to do this is with a combination of a delay and pan controls. You hard pan the mix left and right and add a tiny, infinitesimal delay to one channel. I mean really tiny or the mix will get lopsided. Our ears, conditioned by thousands of years warding off wild animals, can appreciate subtle shifts in the direction a sound comes from. As you add the delay, listen for the sound to "open up". It will if you do this right. Just another thing you can do with simple pan controls.

Panning the Orchestra

There is no absolute way to create a sonic image of an orchestra, but it does make sense to follow a classic seating chart which helps create a balanced, uniform sonic image. Note in the example below, how frequency ranges of the instruments (i.e., how bassy, mid range or treble-like the instruments are) tend to avoid conflict. The Bass Drum is far from the double basses. Also note how they reinforce each other. The Cellos and Violas can play one part distinctly on the right while the violins play a different part of the left. When they all play together there is a pleasing wash of sound, sometimes called a "pad" in electronic lingo. Note that the woodwinds, perhaps the most melodic of the orchestra, are centered. As you go to the right, the sound goes from soft to hard, from sweetness to bratty trumpets and tubby tubas. As you go left, it gets more delicate, with soft horns, piano or harp. In the back, you have your short and louds, like Piatti (cymbal) Snare, Bass Drum and Timpani. In the front, you have the long and softs, the strings.

To pan your MIDI orchestra, 0 should be far left and 127 is far right. You rarely want to set any instrument to an extreme value. For example, Harp, might be set to 20, French Horn to 40, Flute to 60, Oboe to 70 and double basses to 110. The Front strings might be at 40 and the Celli at 89. Don't read these numbers as absolutes, they are just an estimate. Every piece of gear sounds a little different. While all synths have 128 theoretical pan values, many of these values do not do anything to the sound. Some only change the actual sonic position every 3, 7, 15 values, some even 31 values. So experiment, move things around "a little" and hopefully the sounds will fall into their pocket.

Tascam Gigastudio 3 Orchestra Sampling Software (Windows)

Less is Often More

Effects should be used minimally. If a stereo effect is so great that you can no longer pinpoint the instrument, you used too much. Another tip here is doubling and detuning. You can make any instrument dramatically wide, yet centered, by putting the same instrument far right (127) and far left (0) and slightly detuning them by about 5-7 cents. This is a great technique for "wall of sound" like mixes that has strings that appear to "float" on the mix. Use it sparingly though, as hard panned doubles can easily take up sonic space where other instruments need to go.

Its good advice to work up a mix without any effects and apply them sparingly in the final stages. After your ears become accustomed to hearing the "in your face" mix, you will notice that as you add effects the mix will become darker, muddier, and less defined. Again that is a sign that you are going overboard.

A Final Point

What i have hoped to show in this article is simply that conservative settings often play a role in strengthening a mix. You rarely have to pan anything 100%, you rarely have to max any one fader or effects send out. Just little bits of signal going to alternate audio paths goes along way towards giving you a breathtaking sonic image. 


Basic Music Mixing Panning Of Channels

This article is as basic as it gets. It's for someone who has never used a mixer and panned channels. In later articles we'll show you how to use two or three lead vocal tracks, how to pan them, delay them, etc. This article is the bare basics.

In the stereo field you have a left speaker and a right speaker. Panning a channel puts that sound somewhere within that field. If you pan a channel hard left (L90), you will hear the sound playing only out of the left speaker. Pan a channel center (C0) and you'll hear the sound coming from directly between the two speakers, right in the center.

Typically in music, certain instruments and sounds consistently appear in the same areas of the stereo field. Technically, you could pan things anywhere. But your goal is to pan instruments and vocals in common recognizable areas that leave space for each other. You could pan every instrument in the song dead center, but if you did, you'd have a train-wreck of noise all on top of each other. Each instrument needs to have its own space in the stereo field (and in the frequency field).

Back in the day, the Beatles panned their vocals hard left and the drums hard right in some of their songs. That wouldn't work today (or back then either). While listening on an Ipod, no one would want to hear a guy singing only in their left ear for an entire song. The industry quickly scrapped that panning experiment.

Here Are Your Basic Panning Starting Points

Note: C=Center, L=Left, R=Right

Lead Vocal - C0 (double and triple vocals are panned in multiple areas)

Snare - L5, or C0, or R5

Kick Drum - C0

Hi Hats / Wood Hit, Clicks, Snaps, Etc. - Between L35 to R35

Cymbals - Between L10 to R10

Bass Guitar - Between L10 to R10

Lead Guitar - Could be anywhere, but usually "at least" 20L or 20R off of center.

Keyboards, Piano, Horns, Violins - Between L80 to R80 or stereo (L90 and R90). All depend on the song and the arrangement. Many times these instruments are stereo, but in a full mix sometimes the piano or a horn is only on one side, around L45 or R45. Also, different musical melodies are sometimes played. One violin melody could be playing on the left while a different one is being played on the right. This will be explained in detail in our future "stereo field" and "music arranging" articles.

I never pan anything L90 or R90 (I'll go L80 or R80) unless its a stereo track whose material doesn't reach the very outer edges. Anything that is panned this hard sometimes is exaggerated when using an Ipod. The sound could be annoying and hot in one ear.

The best way to learn where instruments are panned is to listen to commercial artists whose music style is similar to yours. Listen to different songs and take notes on where the instruments appear in the stereo field. This will at least give you some idea of what's going on.

Note: When multiple vocals or stereo instrument tracks are playing it could be hard, if not impossible, to tell exactly where they are panned. In future articles, we will explain in detail different advanced panning techniques that will help you quickly decipher what's going on in your favorite artist's songs. Which means you can emulate these commercial panning techniques.

Tuesday, April 19, 2011

Audio Expansion Basics

Audio expansion means to expand the dynamic range of a signal. It is basically the opposite of audio compression.

Like compressors and limiters, an audio expander has an adjustable threshold and ratio. Whereas compression and limiting take effect whenever the signal goes above the threshold, expansion effects signal levels below the threshold.

Any signal below the threshold is expanded downwards by the specified ratio. For example, if the ratio is 2:1 and the signal drops 3dB below the threshold, the signal level will be reduced to 6dB below the threshold. The following graph illustrates two different expansion ratios — 2:1 and the more severe 10:1.


Expansion Graph
Input Level vs Output Level With Expansion

An extreme form of expander is the noise gate, in which lower signal levels are reduced severely or eliminated altogether. A ratio of 10:1 or higher can be considered a noise gate.
Note: Some people also use the term audio expansion to refer to the process of decompressing previously-compressed audio data.

Audio Limiter Basics

A limiter is a type of compressor designed for a specific purpose — to limit the level of a signal to a certain threshold. Whereas a compressor will begin smoothly reducing the gain above the threshold, a limiter will almost completely prevent any additional gain above the threshold. A limiter is like a compressor set to a very high compression ratio (at least 10:1, more commonly 20:1 or more). The graph below shows a limiting ratio of infinity to one, i.e. there is no gain at all above a the threshold.

Limiting Graph
Input Level vs Output Level With Limiting Threshold

Limiters are used as a safeguard against signal peaking (clipping). They prevent occasional signal peaks which would be too loud or distorted. Limiters are often used in conjunction with a compressor — the compressor provides a smooth roll-off of higher levels and the limiter provides a final safety net against very strong peaks.

Monday, April 18, 2011

The Basics of Reverb


Reverb is arguably one of the most often-used effects in modern recording, and probably one of the most misunderstood. It’s interesting to consider the fact that, as with so many things, we’ve spent decades perfecting different ways to imitate something that occurs on its own in nature.

This month we’ll take a look at one of modern recording’s favorite effects – how it has evolved, its use and its misuse. Let’s start with a little bit of history. 

Early Reflections

In the earliest recordings, the only reverb was what occurred naturally in the recording environment. The sound of the room itself was picked up by the microphone (and in most cases it was just that – one microphone), and rooms with great sonic characteristics (mainly theaters, symphony halls and the like) were sought after as recording environments. This worked fine for the recordings of the day, which were mainly of the orchestral and operatic genres.

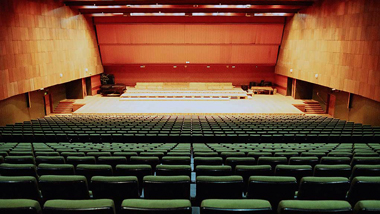
In the post-WW2 Big Band era of the late 1940s and early 1950s, radio began to play an increasingly important role in how audiences consumed recorded music. Improvements in microphone technology and the advent of audio tape made it possible for recording engineers of the day to experiment with mic placement, increasing consciousness about reverb, if not necessarily options. One of the first documented uses of natural (ambient) reverb to intentionally enhance a recording was by engineer Robert Fine, who introduced ambient mics on some of the early “Living Presence” recordings on Mercury Records.
 
Harmonicats Album Cover
The first use of artificial reverb.
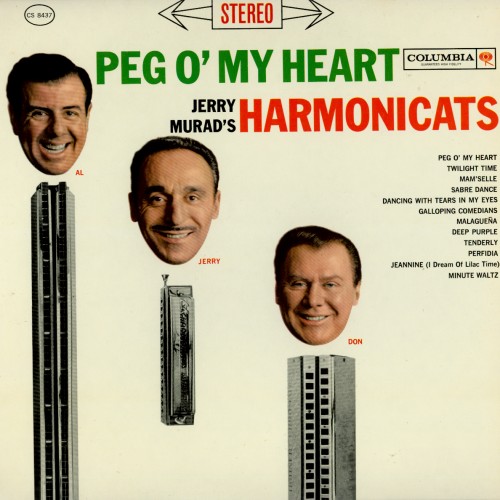
It was none other than Bill Putnam, Sr., founder of Universal Audio, who pioneered the use of artificial reverb in recordings in 1947. Putnam converted his studio’s bathroom to create one of the first purpose-built echo chambers, placing a speaker in one corner and a microphone in another, and mixing the sound with a live recording. The unique sound of his Universal Records label’s first recording, “Peg o’ My Heart” by The Harmonicats, was a runaway hit, and Putnam went on to design reverb chambers for his studios in Chicago and Los Angeles. Other studios followed suit (including the still-active chambers under the Capitol Records building in L.A.), and the sound of echo chambers dominated the recordings of the 1950s.

As groundbreaking as Putnam’s echo chamber concept was, it still utilized the natural ambience and reverb of a real space. It wasn’t until 1957 that the German company Elektro-Mess-Technik (EMT) unveiled their EMT 140, the first plate reverb. The famed EMT 140 (and subsequent units) worked by attaching a small transducer (loudspeaker) to the center of a thin sheet metal plate; vibrations from the speaker were sent across the surface of the plate, and were picked up by one or more small pickups attached to the edge of the plate. The result was a dense, warm sound that emulated a natural room echo but was uniquely its own. And while the EMT plate reverbs were large and unwieldy, they were still a cheaper and more versatile alternative to building a dedicated echo chamber.

Another technology that emerged during the 1950s was spring reverb. Essentially, a spring reverb works in much the same way as a plate, but substitutes springs for the metal plate. Because springs take up far less space, spring reverbs became popular in applications where plate reverbs were impractical, including early guitar amps (Fender’s being the most well-known) and Hammond organs.

Lexicon 224 LARC
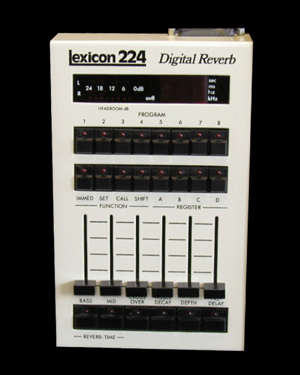
Lexicon 224: The quintessential '80s reverb.
The advent of digital technology in the late 1970s and early 1980s changed the face of most things audio-related, including reverb. Digital reverbs made it possible to create “programs” that emulated the natural ambience of any space, as well as the sound of plate, spring and other electronic reverb sources. In almost no time at all, a veritable flood of digital reverb and multi-effects boxes appeared on the market. Some of the most popular units included the EMT 250 and Lexicon’s 224 and 480, and Yamaha’s Rev7 and SPX90. Now it was even possible to modify the parameters of those programs to create effects that don’t occur naturally, including artificially altering early reflections (the first reflected sound), pre-delay (the time before the first reflected sound is heard), and even reverse and gated reverb (probably one of the most overused snare effects of the 1980s). 

Less is More 

In the early days of recording, the only reverb on a record was that of the room the recording took place in. Studios were prized for their natural ambience. As multitracking evolved, studios were designed to be fairly “dead” and mics were placed close to each instrument to capture as much direct sound as possible, with minimal reflections from the room. A single reverb device (usually a plate or chamber) was then used to create an artificial “room” ambience.
In today’s DAW-oriented world, signal processing is cheap and plentiful. Even entry-level recording programs offer a multitude of reverbs, and today’s recordings typically employ one or more reverbs on each instrument. Now the challenge is no longer which reverb to use, but what combination of reverbs works to create a cohesive and natural sound.

Not surprisingly, it’s easy to overdo it. In fact, excessive or poorly used reverb is one of the most common mistakes inexperienced recordists make. An instrument’s direct sound is important in establishing directionality and clarity. Add too much reverb and your mix can easily become a lush pool of mush. One general guideline to consider is that, unless you’re intentionally after a special effect, the best use of reverb is typically when it’s almost imperceptible within your mix. 

Anatomy of a Reverb 

At first look, many of the parameters of reverb units can be pretty confusing. We can simplify things by breaking it down to basic physics.
Like throwing a stone into a pool of water, sound emanates from the source in waves. Those waves eventually hit multiple surfaces (walls, ceiling, floor, seating, whatever) and echo back, mixing with the original sound. The way we hear that sound depends on several factors — how far away those various reflective surfaces are, what they’re made of, where our ears are located in relation to the original and reflected sound waves, and even other subtle factors like temperature, humidity, altitude and more. In most cases, what we hear is the product of thousands of echoes, reflected many times.

Our brains decode this information in various ways. The first echoes that occur when sound waves hit surfaces (early reflections) and the amount of time between the initial sound and those first reflections (pre-delay) work together to tell us how large the space is, and what our position is within the space.

The length of time until the echoes die away (decay) also helps determine the size of the space, but the way that decay interacts with the early reflections also makes a difference. For example, a small but reflective room (e.g., a tiled bathroom) can have a decay time similar to a larger hall, but the smaller room’s early reflections will arrive sooner.


UA Bathroom Echo Chamber
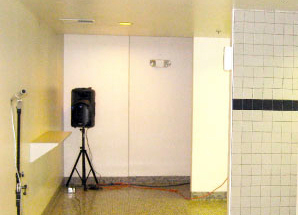
Old School: a custom "Men's Room" echo chamber.
The tonal color of the reflections also plays a critical role. The reverb in that tiled bathroom will be considerably brighter sounding than a larger room with wood or fabric-covered walls. Larger halls will also attenuate different frequency ranges at different rates, and the combination of which ranges last longer also affects our perception of the space.

Other factors also affect our perception, including density (how tightly packed the individual reflections are) and diffusion (the rate at which the reflections increase in density following the original sound). A large room with parallel walls will usually have a lower diffusion rate than a similarly sized room with non-parallel or irregularly shaped walls.

As you can imagine, creating a natural sounding ambience is a complex, multi-faceted process that involves programming dozens of interdependent parameters. For the most part, it’s best to find a reverb program that comes close to what you’re looking for, and keep the tweaking to a minimum.

What Works Where 

As with most effects, there are no hard and fast rules, other than the age-old adage “trust your ears.” But here are a few general guidelines to start with.
As stated earlier, less is more. You’ll achieve more natural sounding results using few reverbs, rather than several. One short, bright program (small room or plate) and a larger, warmer program (large room or hall) will often be enough to cover most of your mix. For best results, insert reverbs into an effect or aux buss, rather than directly into a signal chain. This will enable you to use the same reverb for multiple tracks, while varying the amount of send for each source.

UAD EMT 140 Plate Reverb Plug-In
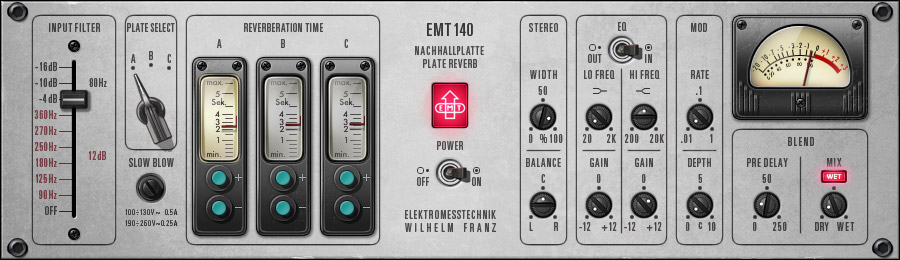
The EMT 140 Plate Reverb plug-in for the UAD platform.
Drums and other percussive sounds typically sound more realistic with small to mid-sized rooms (shorter reverb tails, shorter pre-delay), or plate programs. A longer pre-delay can create the impression of a “phantom” doubled attack, while a longer reverb decay can affect directionality and clarity. Too much high-frequency content can create a harsh, brittle sound, particularly on snare drums. Lower density settings can also sound coarse and unnatural on drums. Higher densities and warmer reverbs will generally deliver better results.

Acoustic instruments like strings, woodwinds and some vocals can benefit from larger room and hall settings and longer pre-delay times, which can help smooth and add depth. Those larger spaces can also be useful in widening a stereo image. Overused, a large room sound can “blur” an instrument’s attack and create a “swimmy” sounding mix that lacks definition and directionality.

One trick for helping to define, rather than blur, the imaging in your mix, is to use reverb in combination with delay. Pan the original sound slightly to one side. Delay the reverb return slightly (try anywhere from 3 to 10 ms) and pan it to the opposite side. This works particularly well to help separate sounds in similar tonal ranges, like multiple stacked guitar tracks.

UAD EMT 250 Electronic Reverb Plug-In
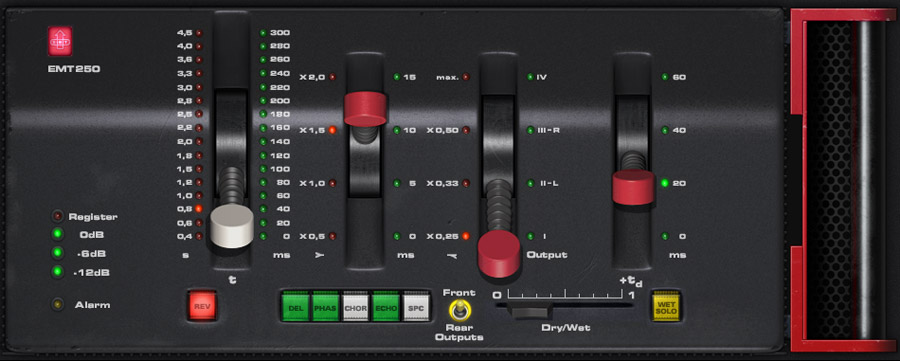
The UAD-2 Powered Plug-In emulation of the classic EMT 250 Electronic Reverb unit.
Vocals can be particularly susceptible to losing definition with larger room settings. Especially with shorter pre-delay times, the reverb can “step on” the vocal, robbing intelligibility. Using a longer pre-delay before the actual reverb kicks in allows the vocal’s clarity and impact to cut through, but gives it a natural “tail” that rings out without blurring. Background vocals are somewhat less critical in this respect, and can often benefit from a larger room setting, which can smooth and blend multiple parts. 

Be Creative 

We’ve spent most of this column talking about the best ways to use reverb naturally. And for the most part, that’s a good idea. In fact, in most instances, the best use of reverb is to create a mix where its use is pretty much indiscernible.
But as with most effects, experimentation can lead to some great surprises, so don’t be afraid to bend the rules. Try combining a couple of different instances of the same reverb with slightly different parameters and panning them left and right. Or try adding a subtle chorus or distortion to a reverb. Again, subtlety is key here – a little bit of something unusual, buried deeply in the mix, might be just the thing to give your mix that special “something.”


Friday, April 15, 2011

Studio Monitor Basics

Powered vs. Unpowered Monitors


Q: Which is better, Powered or Unpowered monitors?
A: The answer, of course, is that there are benefits to either, and that it depends on your situation. A "powered" monitor is one that is self-powered, or has its amplification built into the speaker cabinet thereby relieving you of purchasing an amplifier separately (and the headaches involved). An "unpowered" monitor is not self-powered which necessitates purchasing a power amplifier. 

Passive / Unpowered Monitors & Amps

To operate Passive / Unpowered Monitors, you simply connect the line-level outputs of your mixer to a power amp and then run speaker wire to the monitor. If you already own a power amp, then passive monitors may be your ticket to saving money. Simple right? Well, yes and no. Now you have to deal with two separate pieces (actually several when you consider cables and connectors) - the monitor and the power amp. Monitors are fairly straight forward, but while figuring out a power amp is not rocket science it's not super easy to set up for the beginning studio owner. Here are just a few issues you'll need to address when using a power amp:

  • Ensure Proper Cooling: If you rackmount your power amp, DO NOT block the front rear or side air vents. The side walls of your rack should be a MINIMUM of two inches from the amp and the back of the rack should be a MINIMUM of four inches away from the back of the amp. Without proper airflow, your amp will not function properly which can cause damage to both the amp and your speaker.
  • Proper Cables: Take time to figure out your inputs and outputs on your amp and purchase the correct cables with proper gauge (at least 22-24 gauge to your amp input, 16 gauge or better to your monitors, depending on distance). Your amp may have balanced or unbalanced XLR, balanced or unbalanced 1/4-inch connectors; or you may find banana plugs, spade lugs or even binding posts. Be sure to reference your owner's manual for specific information.
  • Use care when making connections, selecting signal sources and controlling the output level.
  • Remember that amps have a sonic character all their own. Just as you might combine the sonic characteristics of a microphone and preamp, you need to consider the combination of the sonic character of your reference monitor and separate amplifier. In other words, the same passive / unpowered monitor will not necessarily sound the same when juiced by different amplifiers.
  • A general rule of thumb when searching for amps to drive your passive / unpowered monitor is to purchase an amp that delivers twice (2 x) the wattage necessary for the monitor (this allowance is for headroom). So if you need 300 watts at 8 ohms, purchase an amp that is rated for 600 watts at 8 ohms. Again, this is just a rule of thumb and is not necessarily true in all cases.
Active / Powered Monitors
 
The benefits that come from investing in Active / Powered Monitors on the surface is that you simply don't have to deal with any of the above-mentioned issues. Many of us don't want to know about ohms, watts, damping, overload protection, crossovers, and the like - it's enough to know that the monitor works, it sounds great and all I really have to do is plug it into my mixer or computer audio interface. Besides, we'd really like to get back to making or recording music. If, on the other hand, you'd like to know more about the technical benefits of Active / Powered Monitors, we suggest you call your Sales Engineer.  


Studio Monitor Placement Guide

Where do you aim the speakers to give you the smoothest and most consistent sound, and how far apart do you place them to give you a good stereo image? The basic rule is to follow the layout of an equilateral triangle, which is a triangle with all three legs the same length. The distance between the two monitors should be roughly the same as the distance between one monitor and your nose in the listening position where you are leaning forward on the console armrest. The speaker axis should be aimed at the half-way point between your furthest forward and the furthest rearward listening positions. This is typically a range of about 24" (600mm). If you can, you also want to try to get your ears lined up with the vertical speaker axis (half way between the woofer and the normal listening position lined up in the best spot possible. If this would have you resting your chin on the console or desktop, you could tilt the monitor back slightly. This keeps your head in the sweet spot whether you're leaning forward adjusting level or EQ, or leaning back and listening to the mix. Don't go crazy trying to get this exact to three decimal places, within an inch or two gets you into the game.

You will also want to keep your monitors upright and vertical even though you'll be tempted to place them on their side to give you a better line of sight behind them. With the monitor on its side, moving your head horizontally means that you are now moving through all those rays, or lobes, where the wavefront from the woofers and tweeters interfere with each other. The midrange frequency response will be different for each head position. It is our opinion that all two-way component monitors, no matter who manufactures them, need to be used with the multi-driver axis vertical (that's just the way it has to be when you're in the near-field).  

What is "Bi-Amplification"?

When a passive system's single amplifier must reproduce the whole audio spectrum, low frequencies rapidly "use up" the amp's headroom. As higher frequencies "ride along" on lower frequency waveforms, they can be chopped off or distorted even though the high frequencies themselves would not be clipping. Separating highs from lows via an active electronic crossover lets a bi-amped system use two different amplifiers. Each is free to drive just one transducer to its safe maximum limit without intermodulation distortion or other interaction between the two drivers. 

How does price relate to sound quality?

Q: Is there really a difference between monitors that are just a few hundred dollars and the ones that I see for a few thousand?
A: Sure, just as you would find qualitative differences in microphones, guitars, preamps, keyboards, etc. that varies in price, so it is with reference monitors. The old adage that "the devil is in the details" is still true. Generally speaking, manufacturers with monitors costing more, such as Genelec, Focal and Mackie (among many) have spent more time developing a better design and use higher quality components. This equates to a more accurate imaging, smoother frequency response, extended low frequencies and clearer high frequencies and consistent quality at different dynamic levels. In other words, better mixes, faster. Saying that, today's crop of monitors from M-Audio, Samson, Edirol (and others) that come in for just a few hundred dollars are a tremendous value for many desktop audio professionals who aren't necessarily planning to finish their mixes (or master) on their own. Our advice is to purchase the best set of monitors your budget can afford - your mix and your ears will thank you.

Thursday, April 14, 2011

Recording Acoustic Guitar

Taylor 314CE Acoustic Guitar
Taylor Guitars
Most home recording engineers are singer/songwriters - recording vocals and acoustic guitar at home. And as any of them will tell you, getting a good acoustic guitar sound can be hard! In this tutorial, we'll take a look at recording the acoustic guitar, one of the most difficult instruments to get right!

Microphone Selection

The first thing to do before you start recording is to select the microphone you'd like to record with. For acoustic guitar, you can do two different techniques: a single, or mono, microphone technique, or a two-microphone, or stereo, technique. What you do is completely up to you and what resources you have available.

For recording acoustic instruments in the highest quality, you'll want to use a condenser microphone rather than a dynamic microphone. Good condenser microphones for acoustic guitar recording include the Oktava MC012 ($200), Groove Tubes GT55 ($250), or the RODE NT1 ($199). The reason you want a condenser microphone rather than a dynamic microphone is very simple; condenser microphones have much better high frequency reproduction and much better transient response, which you need for acoustic instruments. Dynamic microphones, like the SM57, are great for electric guitar amplifiers which don't need as much transient detail. 

Microphone Placement

Take a listen to your acoustic guitar. You'll find that the most low-end build-up is near the sound hole itself; the higher-end buildup will be somewhere around the 12th fret. So let's look at the two types of microphone placement I mentioned earlier. 

Single Microphone Technique 

If using just a single microphone, you'll want to start by placing the microphone at about the 12th fret, about 5 inches back. If that doesn't give you the sound you want, move the mic around; after you record it, you might want to give it extra body by "doubling" the track - recording the same thing again, and hard-panning both left and right.

When using a one-microphone technique, you might find that your guitar sounds lifeless and dull. This is generally fine if you're going to be mixed into a mix with many other elements in stereo, but should be avoided when the acoustic guitar is the primary focus of the mix.

Two-Microphone (Stereo) Techniques

If you have two microphones at your disposal, put one around the 12th fret, and another around the bridge. Hard pan them left and right in your recording software, and record. You should discover that it's got a much more natural and open tone; this is really easy to explain: you have two ears, so when recording with two microphones, it sounds more natural to our brain. You can also try an X/Y configuration at around the 12th fret: place the microphones so that their capsules are on top of each other at a 90 degree angle, facing the guitar. Pan left/right, and you'll find that this gives you a more natural stereo image sometimes.

Using The Pickup

You might want to experiment using the built-in pickup as well, if you've got the inputs to do it. Sometimes taking the acoustic guitar's pickup and blending it with microphones can yield a more detailed sound; however, it's totally up to you, and in most cases, unless it's a good quality pickup, it'll sound out of place on a studio recording. Remember to experiment. Each situation will be different, and if you don't have any microphones to record with, a pickup will do fine.
 
Mixing Acoustic Guitar 

If you're mixing acoustic guitar into a full-band song with other guitars, especially if those guitars are in stereo, you might be better off with a single-mic technique, because a stereo acoustic guitar might introduce too much sonic information into the mix and cause it to become cluttered. If it's just you playing guitar and vocals, a stereo or doubled mono technique will sound the best.

Compressing acoustic guitar is subjecting; a lot of engineers will go both ways. I personally hardly ever compress acoustic guitar, but a lot of engineers do. If you chose to compress, try to very lightly compress it - a ratio of 2:1 or so should do the trick. The acoustic guitar itself is very dynamic, and you don't want to ruin that.

Remember, any of these techniques can apply to other acoustic instruments, too!

Wednesday, April 13, 2011

Audio compressor basics

Compression is a very important aspect of audio production. You need to have an idea of what the audio compressor does and what all those buttons do. Everybody uses it differently and everyone has a method. These methods are created after mastering the tool that compression is.
You can't have a specific method to compression if you don't know how to instinctively use it. You can't only know what one button does and ignore the others. That's no method.
Therefore, let me introduce you to all the typical buttons an audio compressor has. What do they do? How do they interact with each other. When you get a grasp on which button to push, knob to turn or slider to move, you have an easier time getting that sound you want. 

Audio compressor

Basically, compressors compress the audio signal you want to process. Easy right? Well, that doesn't really tell you anything. Compressors even out the audio signal at a certain level, called the threshold and compress the level above at a certain ratio you determine. We push the loud levels lower and therefore have a less dynamic signal.

Now, let's get into all the buttons and sliders and whatnot. As an example, I'm using Logic's Audio Compressor. Any compressor you have will almost certainly have the same buttons.

Logic's compressor

Let's start with the most important parts first. If you have a incredibly basic audio compressor on your hands, chances are you only have these two parameters to work with. Threshold and Ratio. 

Threshold

The threshold determines at what level the compressor starts acting. Say you have a signal that has peaks at around -1dB on the meters of your fader. If you have your threshold at -10, the compressor will start working when your audio starts going over the -10dB threshold. 

Now, if you have a weak signal that never goes over -15dB and you have your compressor on -10dB there's no compression going to take place. Maybe, if you have a swanky cool compressor it will give you a nice color to your sound, but as for actual compression, nada. 

The signal doesn't reach the threshold, and therefore none of the other parameters of the compressor are going to start working. But once that signal goes over your threshold it will get compressed. How much will it get compressed? Well that brings us to our next button.
  
Ratio

The ratio is where you determine how much compression you are going to apply to a signal that goes over your threshold. For every signal that goes over the threshold, it gets compressed according a certain ratio.

Example: For a compressor with a threshold at -10dB and a 3:1 ratio, a nice starting point for vocals. If you have a semi-constant level of the vocal at -1dB it will become compressed so that it only reaches -7dB.

Why?


Because after going over the threshold the vocal reaches its peak 9dB after -10dB, or at -1dB. We take those 9dB and divide them by three, since the ratio is at 3:1. Out of that we get 3dB which we add to the threshold at -10dB. A compression of 6dBs reaching its peak at -7dB. Let's illustrate this with a simple formula:


In this formula you can see the basics of calculating the output of a compressor.

compressor equation

If we take the example above and apply it to this formula, we get this:


compressor in practice


So you see, that if we have a higher ratio, we compress the signal more resulting in less signal coming out of the output. 

Say we have an example of a loud kick drum that's peaking at +4dB but we have a threshold at -20dB and a ratio of 8:1. That's a lot of compression but serves to illustrate a point.

We have a dynamic range of 24 dBs, from -20dB to +4dB. We are compressing everything that goes over -20dB by a ratio of 8:1.


Let's plug those numbers into the equation:
kick drum compression


The highest peaks of the kick drum that are reaching +4dB before are now only reaching -17dB! That 24dB dynamic range we had from -20dB to +4dB has been reduced to 3dB. Talk about over-compression!

After studying these formulas and basics behind the relationship between threshold and ratio, I think we can move on to the next phase of our compressor journey.  

The limiter

A limiter does things a little differently when it comes to the ratio and how it reacts to sounds that go over the threshold. Instead of compressing the peaks that go over the threshold, a limiter simply cuts them off. Which can actually sound better sometimes!

The knee


The knee on the audio compressor has a relationship with the ratio. It applies compression gradually increasing the ratio until a certain point. See the link below for a detailed explanation.

Attack & Release

Every plugin seems to have an attack and release of some sort. And they often don't even mean the same thing. Let's dive into how the attack and release on the audio compressor work.

Attack

The attack, measured in milliseconds, is how fast the compressor starts acting on a signal. With a fast attack the compressor starts working right away on the audio, often dulling the sound of the transient. 

What's a transient? Transients are the first seconds, or attack of the envelope of a signal. Huh? The  first peaks of a signal are called the transients ok? Drums have fast and loud transients !Whack! !Whack! But a cello might have a slower transient, or attack.

By using a fast attack you make the audio compressor chomps down right away on a signal, but with a slower attack time the initial attack, transient or punch gets through before the rest of the signal is compressed. 

In practice:

  • For a punchier kick drum have a slower attack so you get the untreated sound of the beater. But if you want a thumpier and more rounded kick drum, have the attack at a fast setting.
  • If you have a bad bass part and you get a lot of uneven notes jumping out at you, having a fast attack setting can help dull out the unexpected pops from the bass player. You can even put the ratio into limiting by having it at 10:1 or higher if you are dealing with a really troublesome part.

Release

In contrast, release is the parameter that determines, in milliseconds, how long the audio compressor will continue acting on a signal once it goes under the threshold again. If the release is too fast you run the risk of the compressor letting go too early, but if you have the release too slow you can get a pumping effect. This pumping effect is a clear sign of over-compression because the compressor never stops compressing. It is too slow too react, even after the signal has gone under the threshold. 

Thus the compressor compresses the next signal too, even though it is under the set threshold. This can work on some instruments with a slow transient response if you want an even compression..

In practice:


  • Try to make your snare drum breathe by making the release go in time with the track. You can watch the time of the release in the gain reduction meter.
  • A quick release on the kick drum is good since the signal of a kick drum is so short. That way you can be sure that it doesn't continue into the next kick drum hit.

Now that we've covered the basics of the attack and release, let's make our way to the most important tool you have when working these aforementioned parameters.

Gain reduction meter


This is the most important visual meter you have when compressing. It shows you, in dB how much you are really compressing. With it you are able to gauge the effect you are making, both by making sure that your signal is reaching the threshold and also seeing how fast the attack and release are working.

If you don't have the threshold low enough you won't see it working at all, since the audio compressor isn't compressing your signal.

If you have your release too slow you can be sure to see how the meter never really goes down. By taking a visual cue from the GR meter you can tweak the release in time with the track.

Obviously it's good practice to use your ears when compressing, but being able to see the amount of reduction and compression visually is a very effective way in quickly finding the correct sound you are looking for. If you only want to control the peaks, it's easier to see on the GR meter when it is only compressing the peaks instead of trying to listen to the actual audio signal.

Makeup-Gain


Lastly, makeup gain is that last parameter we need to worry about. Since an audio compressor turns down the volume of certain parts of our audio signal, we need a gain knob to increase the average volume to where it was before we started compressing. If we are always compressing around 3dBs we will need to turn the gain up 3dB in order to make up the loss in volume by compressing.
Reference: Gibson, Bill.(2007). Instrument & Vocal Recording. Hal Leonard Books.


focusrite compressor


Buss compression


drum compressionYou can crank up the sound of your drums by using buss compression in your tracks. 

By using parallel compression underneath the dynamic drum tracks you can create a larger than life sound.


Multiband compression


Multiband compression is used for many purposes, and can be a handy tool for mastering your tracks. By using multiband compression you can define the specific frequency areas you want to compress, using different compression values on separate areas of the frequency spectrum. 

Conclusion

Now that we've gone through the knobs you can find on your typical audio compressor you are all set to start compressing. If you need further tips on compressing, or want to share your cool compression tips, please share it with the rest of us here below. Everybody is always looking to enhance their understanding of compression.