
 |
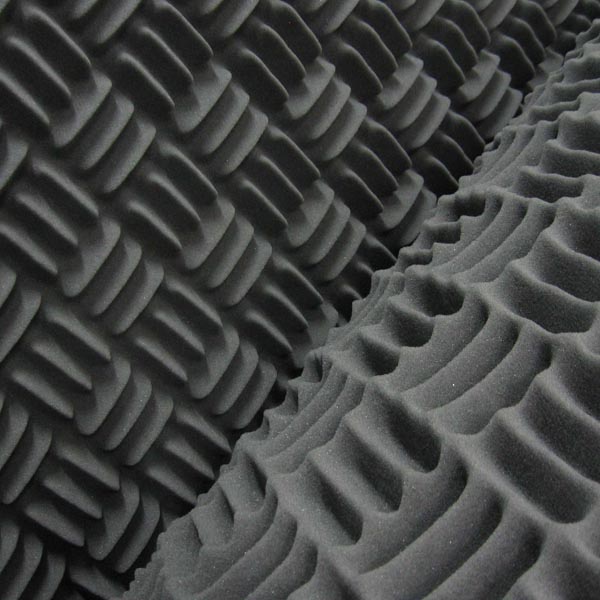
| Sonex 600 Acoustic Foam |
The science of acoustics is something that tends to alternately baffle and intimidate most of us. Outside of a handful of highly trained individuals, the aspects of what makes a room sound a certain way is looked upon as a sort of black art. Performance venues and upscale recording studios routinely include acoustic designers in their construction budgets, spending considerable sums of money in pursuit of sonic perfection.
But for the average musician, budgeting for acoustic treatment has traditionally ranked well below the more tangible fun stuff like instruments, mics, recording gear, plug-ins, toys and more toys. Even if you’re at liberty to physically alter your space without incurring a landlord’s wrath, budgeting for two-by-fours, sheetrock and caulking doesn’t tend to hold the same appeal as that new channel strip plug-in or twelve-string you’ve been pining for.
Fortunately, the same technological revolution that has brought multitracking into spare bedrooms and one-car garages has also created low-cost solutions for many of the common acoustical issues facing the average project studio. In this month’s Studio Basics we’ll look at some ideas to smooth out your sonic nightmares.
Just Scratching the Surfaces
Let’s start off with a disclaimer: the purpose of this article is not to give you an education on acoustics. There are plenty of authoritative books on the subject, among them F. Alton Everest’s classic “How to Build a Small Budget Recording Studio from Scratch,” as well as a wealth of great articles and web posts. Rather, our goal here is to talk about some of the most common issues we encounter in our musical spaces, and some of the means available to address them.
That said, let’s divide the concept of acoustic treatment into some basic categories. There’s insulation, which usually entails keeping the sounds of the outside world out, or keeping your own sounds in. Closely related is isolation – the art of keeping individual sounds from bleeding too heavily into each other.
The other challenge is a bit more subtle, and has to do with how our rooms affect the sounds we’re creating in them. In any given space, the characteristics of that space have a direct effect on what we’re hearing. That’s why an instrument will sound different in a large hall than it will in a small club. It’s also the reason your mix sounds so different in your home studio than it does when you’re squirming in your chair in that A&R guy’s office.
The average home studio or rehearsal space rarely does well in addressing any of these issues. Most times we’re dealing with a spare bedroom, converted garage, basement or loft, none of which boast construction aspects that are in any way conducive to good sound. Thin, parallel walls, boxy shaped rooms, low ceilings and rattling window frames are only some of the enemies we face.
Even a few short years ago, the only way to address these issues involved massive amounts of money, materials and frustration. While the ultimate solution is still to plan and construct a purpose-built environment from the ground up, these days there are a number of ways to markedly improve your odds of making your workspace sound better without having to sell your instruments or smash your fingers.
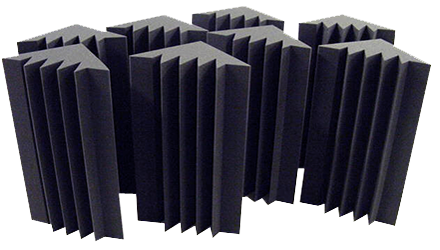 |
| Bass Traps |
Soundproofing and Insulation
One of the most frustrating aspects of sound is that it will go where it wants to, and find its way through any space via any available path. That’s why it’s so important (and so difficult) to block any potential points where sound can leak through. In all cases, mass is your friend – the thicker and more dense your walls are, the better they’ll be at stopping sound.
Even more effective is mass combined with air. The most common construction technique is what’s known as a “floating room,” where an entirely new set of walls, floor and ceiling are built within the existing space, detached and separated by several inches from the outside walls (and, in the case of flooring, by rubberized “floaters” that lessen the transfer of vibrations). If you’re constructing your own space, there are companies that offer soundproofed doors and windows, as well as soundproof wall panels in pre-set or custom sizes.
Even if you don’t have the luxury of new construction, sealing areas of potential leakage in your existing structure will go a long way toward keeping the inside sounds in and outside out. For doors and window frames, look for the thickest, most dense weatherstripping that will fit in the allotted space. Use caulking to seal around areas like heating and air conditioning ducts, electrical outlet boxes, lighting fixtures, unfinished drywall joints and, if you’ve got them, tiled ceilings. While there are countless varieties of commercially available caulks and sealants, consider a latex sealant designed for acoustical applications.
You can also accomplish a lot by adding sound blocking layers to your existing walls. Several companies offer low-vibration materials which are exceptionally dense but surprisingly thin and lightweight.
If You Can’t Do the Whole Room…
For many of us, especially those who can eschew live drums, the toil and expense of insulating the entire room can be avoided by simply isolating only those elements that need it. In traditional studios, isolation booths have long been used to separate the vocalist or drummer during a live take. While these tend to be of the permanently-constructed variety, a number of companies offer various sizes of portable, lightweight “iso-booths” that can be assembled quickly and easily when and where you need them. Alternatively, you can search the web and find plans to build your own.
Another variation on the iso-booth that has become increasingly popular is the amplifier chamber. These can vary from small, soundproofed boxes just large enough to hold your guitar amp and a mic stand, to cabinets with speaker and mic (XLR) jack built in.
Your Biggest Fan
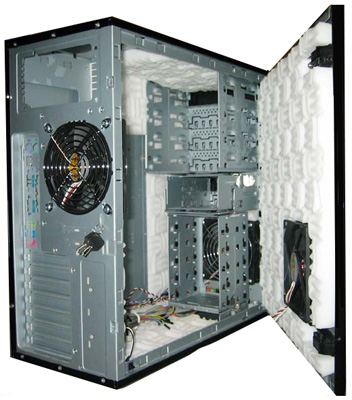 |
| Sonex Computer Case |
Your computer can be one of the biggest contributors of noise in your studio space. Particularly if your room is otherwise relatively quiet, the background hum of one or more computers can adorn your delicate acoustic tracks with all the ambience of a runway at Heathrow.
If you’re reasonably computer-savvy (or know someone who is), replacing your computer’s stock fan with a whisper-silent one is a quick way to reduce the noise. Another option is to look into sound-dampening cases with quiet cooling systems, which can knock off several decibels of noise, as well as cabinets that will completely enclose your computer’s CPU.
Semi-Isolation
In many cases, complete isolation is neither necessary nor desirable. As anyone who has ever recorded a live band will tell you, a little leakage can be a good thing, adding a natural sounding element that’s sometimes lost by separating things too much. Sometimes a bit of baffling between players and/or amps is all that’s necessary to provide enough separation for a decent recording.
This is typically accomplished with a gobo, a small portable wall panel around four or five feet tall. Many people build their own, sometimes covering one side with carpet or other absorbent material, the other with a reflective surface like parquet, and putting them on wheels for easy maneuvering. You can also find pre-manufactured versions of these, as well as transparent acrylic panels to surround the drummer but still allow for that all-important eye contact.
Fixing the Vibe
Let’s shift gears now and talk about the other major challenge in any studio: controlling the sonic characteristics of your space. Every acoustic environment’s sound is dictated by a number of factors, including the distance between walls, the height of the ceiling, the angles at which the walls meet and the materials comprising the surfaces, not to mention the composition and placement of tables, pictures and other surfaces, furniture, curtains, etc.
For the vast majority of us, our creative environments end up being places like basement rooms, garages or second bedrooms – typically smallish boxes with parallel walls. These types of spaces tend to encourage the buildup of standing waves, resonant frequencies and other sonic anomalies that can substantially color what we’re hearing, rarely for the better. The hard surface of a side or rear wall can create reflections that can significantly change the sound of your mix.
Step One – Identify the Problem
Many of today’s software programs offer tools to help identify some of the most common issues. Spectral analyzers, also known as Real Time Audio meters (RTA’s), are basically meters that break the sound down by various frequency groups, and can tell you a lot about what your room is (or isn’t) doing to your mix. By using a reasonably sensitive microphone in various spots throughout the room, an RTA can help to identify areas where there’s an excess buildup of certain frequencies. Some audio software applications have RTA’s built into the program. You can also get dedicated software or hardware units that can perform the same function.
One important caveat here: meters can be invaluable when used correctly, but meters don’t mix music – your ears do. Trust your ears first and foremost. Listen and compare, then use the meters to verify what you’re hearing.
Stop and Reflect
Generally, your best defense against unwanted reflections is to attack problem areas with a combination of absorption and diffusion. Absorptive materials prevent or greatly reduce reflection, while diffusers break up the reflection, scattering the waves in a multitude of different directions and greatly lessening their impact.
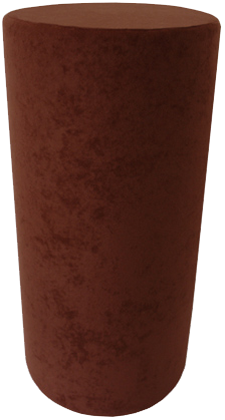 |
| Bass Bin Trap |
Much can be accomplished using common sense and everyday materials. The rear wall of my office/project room has a large, floor-to-ceiling bookshelf, fully stocked. Heavy carpeting and thick, theater-style curtains also work well, and you’d be surprised at the difference a strategically placed overstuffed sofa can make. But a number of commercial (and slightly less unwieldy) products are also available, including acoustic foams, fiberglass panels and blankets.
Also available are a number of diffuser products – geometrically-shaped panels and materials that, attached to your flat surfaces at strategic locations, can go a long way toward breaking up and eliminating reflections. And a number of companies offer products created of dense, uneven materials that will both absorb and diffuse sound waves, giving you the best of both worlds.
Bass traps, also known as barrel diffusers, are another popular means of addressing specific areas of your environment. Their typically cylindrical shape and uneven, absorptive finish work wonders to break up reflections in problem areas of your room. I’ve seen people construct these from plastic trash cans, though less inelegant versions are available commercially. Many companies offer bass traps that also perform as speaker stands, studio furniture, and even entire modular environments.
Conclusion
As I mentioned at the top of this article, the science of acoustics can be wide-ranging and confusing. While we know a lot about how sound behaves and what to expect out of a given space, there are always enough variables to keep it interesting. A new instrument, more bodies in the room, even changes in the weather….everything can influence the way things sound. What works for one situation may not be ideal for another, and the best we can do is to try and create as neutral and objective a listening environment as possible. Arm yourself with good monitors, meters and spectral analyzers, identify and correct obvious problem areas, and listen to as many different types of music, mixes and instruments as you can. But at the end of the day the most important tools you have are your ears – if it sounds good, it probably is good.
Source: http://www.uaudio.com
hypersmash.com


 Where do you aim the speakers to give you the smoothest and most consistent sound, and how far apart do you place them to give you a good stereo image? The basic rule is to follow the layout of an equilateral triangle, which is a triangle with all three legs the same length. The distance between the two monitors should be roughly the same as the distance between one monitor and your nose in the listening position where you are leaning forward on the console armrest. The speaker axis should be aimed at the half-way point between your furthest forward and the furthest rearward listening positions. This is typically a range of about 24" (600mm). If you can, you also want to try to get your ears lined up with the vertical speaker axis (half way between the woofer and the normal listening position lined up in the best spot possible. If this would have you resting your chin on the console or desktop, you could tilt the monitor back slightly. This keeps your head in the sweet spot whether you're leaning forward adjusting level or EQ, or leaning back and listening to the mix. Don't go crazy trying to get this exact to three decimal places, within an inch or two gets you into the game.
  When a passive system's single amplifier must reproduce the whole audio spectrum, low frequencies rapidly "use up" the amp's headroom. As higher frequencies "ride along" on lower frequency waveforms, they can be chopped off or distorted even though the high frequencies themselves would not be clipping. Separating highs from lows via an active electronic crossover lets a bi-amped system use two different amplifiers. Each is free to drive just one transducer to its safe maximum limit without intermodulation distortion or other interaction between the two drivers.
 Q: Is there really a difference between monitors that are just a few hundred dollars and the ones that I see for a few thousand?