Search on this web:
Custom Search

Tuesday, April 19, 2011

Audio Expansion Basics

Audio expansion means to expand the dynamic range of a signal. It is basically the opposite of audio compression.

Like compressors and limiters, an audio expander has an adjustable threshold and ratio. Whereas compression and limiting take effect whenever the signal goes above the threshold, expansion effects signal levels below the threshold.

Any signal below the threshold is expanded downwards by the specified ratio. For example, if the ratio is 2:1 and the signal drops 3dB below the threshold, the signal level will be reduced to 6dB below the threshold. The following graph illustrates two different expansion ratios — 2:1 and the more severe 10:1.


Expansion Graph
Input Level vs Output Level With Expansion

An extreme form of expander is the noise gate, in which lower signal levels are reduced severely or eliminated altogether. A ratio of 10:1 or higher can be considered a noise gate.
Note: Some people also use the term audio expansion to refer to the process of decompressing previously-compressed audio data.

Audio Limiter Basics

A limiter is a type of compressor designed for a specific purpose — to limit the level of a signal to a certain threshold. Whereas a compressor will begin smoothly reducing the gain above the threshold, a limiter will almost completely prevent any additional gain above the threshold. A limiter is like a compressor set to a very high compression ratio (at least 10:1, more commonly 20:1 or more). The graph below shows a limiting ratio of infinity to one, i.e. there is no gain at all above a the threshold.

Limiting Graph
Input Level vs Output Level With Limiting Threshold

Limiters are used as a safeguard against signal peaking (clipping). They prevent occasional signal peaks which would be too loud or distorted. Limiters are often used in conjunction with a compressor — the compressor provides a smooth roll-off of higher levels and the limiter provides a final safety net against very strong peaks.

Monday, April 18, 2011

The Basics of Reverb


Reverb is arguably one of the most often-used effects in modern recording, and probably one of the most misunderstood. It’s interesting to consider the fact that, as with so many things, we’ve spent decades perfecting different ways to imitate something that occurs on its own in nature.

This month we’ll take a look at one of modern recording’s favorite effects – how it has evolved, its use and its misuse. Let’s start with a little bit of history. 

Early Reflections

In the earliest recordings, the only reverb was what occurred naturally in the recording environment. The sound of the room itself was picked up by the microphone (and in most cases it was just that – one microphone), and rooms with great sonic characteristics (mainly theaters, symphony halls and the like) were sought after as recording environments. This worked fine for the recordings of the day, which were mainly of the orchestral and operatic genres.

In the post-WW2 Big Band era of the late 1940s and early 1950s, radio began to play an increasingly important role in how audiences consumed recorded music. Improvements in microphone technology and the advent of audio tape made it possible for recording engineers of the day to experiment with mic placement, increasing consciousness about reverb, if not necessarily options. One of the first documented uses of natural (ambient) reverb to intentionally enhance a recording was by engineer Robert Fine, who introduced ambient mics on some of the early “Living Presence” recordings on Mercury Records.
 
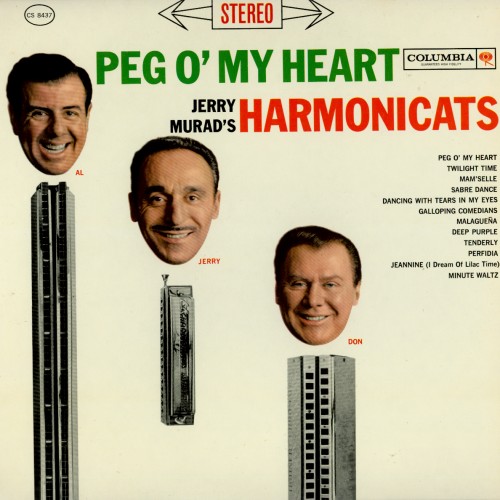
Harmonicats Album Cover
The first use of artificial reverb.
It was none other than Bill Putnam, Sr., founder of Universal Audio, who pioneered the use of artificial reverb in recordings in 1947. Putnam converted his studio’s bathroom to create one of the first purpose-built echo chambers, placing a speaker in one corner and a microphone in another, and mixing the sound with a live recording. The unique sound of his Universal Records label’s first recording, “Peg o’ My Heart” by The Harmonicats, was a runaway hit, and Putnam went on to design reverb chambers for his studios in Chicago and Los Angeles. Other studios followed suit (including the still-active chambers under the Capitol Records building in L.A.), and the sound of echo chambers dominated the recordings of the 1950s.

As groundbreaking as Putnam’s echo chamber concept was, it still utilized the natural ambience and reverb of a real space. It wasn’t until 1957 that the German company Elektro-Mess-Technik (EMT) unveiled their EMT 140, the first plate reverb. The famed EMT 140 (and subsequent units) worked by attaching a small transducer (loudspeaker) to the center of a thin sheet metal plate; vibrations from the speaker were sent across the surface of the plate, and were picked up by one or more small pickups attached to the edge of the plate. The result was a dense, warm sound that emulated a natural room echo but was uniquely its own. And while the EMT plate reverbs were large and unwieldy, they were still a cheaper and more versatile alternative to building a dedicated echo chamber.

Another technology that emerged during the 1950s was spring reverb. Essentially, a spring reverb works in much the same way as a plate, but substitutes springs for the metal plate. Because springs take up far less space, spring reverbs became popular in applications where plate reverbs were impractical, including early guitar amps (Fender’s being the most well-known) and Hammond organs.

Lexicon 224 LARC
Lexicon 224: The quintessential '80s reverb.
The advent of digital technology in the late 1970s and early 1980s changed the face of most things audio-related, including reverb. Digital reverbs made it possible to create “programs” that emulated the natural ambience of any space, as well as the sound of plate, spring and other electronic reverb sources. In almost no time at all, a veritable flood of digital reverb and multi-effects boxes appeared on the market. Some of the most popular units included the EMT 250 and Lexicon’s 224 and 480, and Yamaha’s Rev7 and SPX90. Now it was even possible to modify the parameters of those programs to create effects that don’t occur naturally, including artificially altering early reflections (the first reflected sound), pre-delay (the time before the first reflected sound is heard), and even reverse and gated reverb (probably one of the most overused snare effects of the 1980s). 

Less is More 

In the early days of recording, the only reverb on a record was that of the room the recording took place in. Studios were prized for their natural ambience. As multitracking evolved, studios were designed to be fairly “dead” and mics were placed close to each instrument to capture as much direct sound as possible, with minimal reflections from the room. A single reverb device (usually a plate or chamber) was then used to create an artificial “room” ambience.
In today’s DAW-oriented world, signal processing is cheap and plentiful. Even entry-level recording programs offer a multitude of reverbs, and today’s recordings typically employ one or more reverbs on each instrument. Now the challenge is no longer which reverb to use, but what combination of reverbs works to create a cohesive and natural sound.

Not surprisingly, it’s easy to overdo it. In fact, excessive or poorly used reverb is one of the most common mistakes inexperienced recordists make. An instrument’s direct sound is important in establishing directionality and clarity. Add too much reverb and your mix can easily become a lush pool of mush. One general guideline to consider is that, unless you’re intentionally after a special effect, the best use of reverb is typically when it’s almost imperceptible within your mix. 

Anatomy of a Reverb 

At first look, many of the parameters of reverb units can be pretty confusing. We can simplify things by breaking it down to basic physics.
Like throwing a stone into a pool of water, sound emanates from the source in waves. Those waves eventually hit multiple surfaces (walls, ceiling, floor, seating, whatever) and echo back, mixing with the original sound. The way we hear that sound depends on several factors — how far away those various reflective surfaces are, what they’re made of, where our ears are located in relation to the original and reflected sound waves, and even other subtle factors like temperature, humidity, altitude and more. In most cases, what we hear is the product of thousands of echoes, reflected many times.

Our brains decode this information in various ways. The first echoes that occur when sound waves hit surfaces (early reflections) and the amount of time between the initial sound and those first reflections (pre-delay) work together to tell us how large the space is, and what our position is within the space.

The length of time until the echoes die away (decay) also helps determine the size of the space, but the way that decay interacts with the early reflections also makes a difference. For example, a small but reflective room (e.g., a tiled bathroom) can have a decay time similar to a larger hall, but the smaller room’s early reflections will arrive sooner.


UA Bathroom Echo Chamber
Old School: a custom "Men's Room" echo chamber.
The tonal color of the reflections also plays a critical role. The reverb in that tiled bathroom will be considerably brighter sounding than a larger room with wood or fabric-covered walls. Larger halls will also attenuate different frequency ranges at different rates, and the combination of which ranges last longer also affects our perception of the space.

Other factors also affect our perception, including density (how tightly packed the individual reflections are) and diffusion (the rate at which the reflections increase in density following the original sound). A large room with parallel walls will usually have a lower diffusion rate than a similarly sized room with non-parallel or irregularly shaped walls.

As you can imagine, creating a natural sounding ambience is a complex, multi-faceted process that involves programming dozens of interdependent parameters. For the most part, it’s best to find a reverb program that comes close to what you’re looking for, and keep the tweaking to a minimum.

What Works Where 

As with most effects, there are no hard and fast rules, other than the age-old adage “trust your ears.” But here are a few general guidelines to start with.
As stated earlier, less is more. You’ll achieve more natural sounding results using few reverbs, rather than several. One short, bright program (small room or plate) and a larger, warmer program (large room or hall) will often be enough to cover most of your mix. For best results, insert reverbs into an effect or aux buss, rather than directly into a signal chain. This will enable you to use the same reverb for multiple tracks, while varying the amount of send for each source.

UAD EMT 140 Plate Reverb Plug-In
The EMT 140 Plate Reverb plug-in for the UAD platform.
Drums and other percussive sounds typically sound more realistic with small to mid-sized rooms (shorter reverb tails, shorter pre-delay), or plate programs. A longer pre-delay can create the impression of a “phantom” doubled attack, while a longer reverb decay can affect directionality and clarity. Too much high-frequency content can create a harsh, brittle sound, particularly on snare drums. Lower density settings can also sound coarse and unnatural on drums. Higher densities and warmer reverbs will generally deliver better results.

Acoustic instruments like strings, woodwinds and some vocals can benefit from larger room and hall settings and longer pre-delay times, which can help smooth and add depth. Those larger spaces can also be useful in widening a stereo image. Overused, a large room sound can “blur” an instrument’s attack and create a “swimmy” sounding mix that lacks definition and directionality.

One trick for helping to define, rather than blur, the imaging in your mix, is to use reverb in combination with delay. Pan the original sound slightly to one side. Delay the reverb return slightly (try anywhere from 3 to 10 ms) and pan it to the opposite side. This works particularly well to help separate sounds in similar tonal ranges, like multiple stacked guitar tracks.

UAD EMT 250 Electronic Reverb Plug-In
The UAD-2 Powered Plug-In emulation of the classic EMT 250 Electronic Reverb unit.
Vocals can be particularly susceptible to losing definition with larger room settings. Especially with shorter pre-delay times, the reverb can “step on” the vocal, robbing intelligibility. Using a longer pre-delay before the actual reverb kicks in allows the vocal’s clarity and impact to cut through, but gives it a natural “tail” that rings out without blurring. Background vocals are somewhat less critical in this respect, and can often benefit from a larger room setting, which can smooth and blend multiple parts. 

Be Creative 

We’ve spent most of this column talking about the best ways to use reverb naturally. And for the most part, that’s a good idea. In fact, in most instances, the best use of reverb is to create a mix where its use is pretty much indiscernible.
But as with most effects, experimentation can lead to some great surprises, so don’t be afraid to bend the rules. Try combining a couple of different instances of the same reverb with slightly different parameters and panning them left and right. Or try adding a subtle chorus or distortion to a reverb. Again, subtlety is key here – a little bit of something unusual, buried deeply in the mix, might be just the thing to give your mix that special “something.”


Friday, April 15, 2011

Studio Monitor Basics

Powered vs. Unpowered Monitors


Q: Which is better, Powered or Unpowered monitors?
A: The answer, of course, is that there are benefits to either, and that it depends on your situation. A "powered" monitor is one that is self-powered, or has its amplification built into the speaker cabinet thereby relieving you of purchasing an amplifier separately (and the headaches involved). An "unpowered" monitor is not self-powered which necessitates purchasing a power amplifier. 

Passive / Unpowered Monitors & Amps

To operate Passive / Unpowered Monitors, you simply connect the line-level outputs of your mixer to a power amp and then run speaker wire to the monitor. If you already own a power amp, then passive monitors may be your ticket to saving money. Simple right? Well, yes and no. Now you have to deal with two separate pieces (actually several when you consider cables and connectors) - the monitor and the power amp. Monitors are fairly straight forward, but while figuring out a power amp is not rocket science it's not super easy to set up for the beginning studio owner. Here are just a few issues you'll need to address when using a power amp:

  • Ensure Proper Cooling: If you rackmount your power amp, DO NOT block the front rear or side air vents. The side walls of your rack should be a MINIMUM of two inches from the amp and the back of the rack should be a MINIMUM of four inches away from the back of the amp. Without proper airflow, your amp will not function properly which can cause damage to both the amp and your speaker.
  • Proper Cables: Take time to figure out your inputs and outputs on your amp and purchase the correct cables with proper gauge (at least 22-24 gauge to your amp input, 16 gauge or better to your monitors, depending on distance). Your amp may have balanced or unbalanced XLR, balanced or unbalanced 1/4-inch connectors; or you may find banana plugs, spade lugs or even binding posts. Be sure to reference your owner's manual for specific information.
  • Use care when making connections, selecting signal sources and controlling the output level.
  • Remember that amps have a sonic character all their own. Just as you might combine the sonic characteristics of a microphone and preamp, you need to consider the combination of the sonic character of your reference monitor and separate amplifier. In other words, the same passive / unpowered monitor will not necessarily sound the same when juiced by different amplifiers.
  • A general rule of thumb when searching for amps to drive your passive / unpowered monitor is to purchase an amp that delivers twice (2 x) the wattage necessary for the monitor (this allowance is for headroom). So if you need 300 watts at 8 ohms, purchase an amp that is rated for 600 watts at 8 ohms. Again, this is just a rule of thumb and is not necessarily true in all cases.
Active / Powered Monitors
 
The benefits that come from investing in Active / Powered Monitors on the surface is that you simply don't have to deal with any of the above-mentioned issues. Many of us don't want to know about ohms, watts, damping, overload protection, crossovers, and the like - it's enough to know that the monitor works, it sounds great and all I really have to do is plug it into my mixer or computer audio interface. Besides, we'd really like to get back to making or recording music. If, on the other hand, you'd like to know more about the technical benefits of Active / Powered Monitors, we suggest you call your Sales Engineer.  


Studio Monitor Placement Guide

Where do you aim the speakers to give you the smoothest and most consistent sound, and how far apart do you place them to give you a good stereo image? The basic rule is to follow the layout of an equilateral triangle, which is a triangle with all three legs the same length. The distance between the two monitors should be roughly the same as the distance between one monitor and your nose in the listening position where you are leaning forward on the console armrest. The speaker axis should be aimed at the half-way point between your furthest forward and the furthest rearward listening positions. This is typically a range of about 24" (600mm). If you can, you also want to try to get your ears lined up with the vertical speaker axis (half way between the woofer and the normal listening position lined up in the best spot possible. If this would have you resting your chin on the console or desktop, you could tilt the monitor back slightly. This keeps your head in the sweet spot whether you're leaning forward adjusting level or EQ, or leaning back and listening to the mix. Don't go crazy trying to get this exact to three decimal places, within an inch or two gets you into the game.

You will also want to keep your monitors upright and vertical even though you'll be tempted to place them on their side to give you a better line of sight behind them. With the monitor on its side, moving your head horizontally means that you are now moving through all those rays, or lobes, where the wavefront from the woofers and tweeters interfere with each other. The midrange frequency response will be different for each head position. It is our opinion that all two-way component monitors, no matter who manufactures them, need to be used with the multi-driver axis vertical (that's just the way it has to be when you're in the near-field).  

What is "Bi-Amplification"?

When a passive system's single amplifier must reproduce the whole audio spectrum, low frequencies rapidly "use up" the amp's headroom. As higher frequencies "ride along" on lower frequency waveforms, they can be chopped off or distorted even though the high frequencies themselves would not be clipping. Separating highs from lows via an active electronic crossover lets a bi-amped system use two different amplifiers. Each is free to drive just one transducer to its safe maximum limit without intermodulation distortion or other interaction between the two drivers. 

How does price relate to sound quality?

Q: Is there really a difference between monitors that are just a few hundred dollars and the ones that I see for a few thousand?
A: Sure, just as you would find qualitative differences in microphones, guitars, preamps, keyboards, etc. that varies in price, so it is with reference monitors. The old adage that "the devil is in the details" is still true. Generally speaking, manufacturers with monitors costing more, such as Genelec, Focal and Mackie (among many) have spent more time developing a better design and use higher quality components. This equates to a more accurate imaging, smoother frequency response, extended low frequencies and clearer high frequencies and consistent quality at different dynamic levels. In other words, better mixes, faster. Saying that, today's crop of monitors from M-Audio, Samson, Edirol (and others) that come in for just a few hundred dollars are a tremendous value for many desktop audio professionals who aren't necessarily planning to finish their mixes (or master) on their own. Our advice is to purchase the best set of monitors your budget can afford - your mix and your ears will thank you.

Thursday, April 14, 2011

Recording Acoustic Guitar

Taylor 314CE Acoustic Guitar
Taylor Guitars
Most home recording engineers are singer/songwriters - recording vocals and acoustic guitar at home. And as any of them will tell you, getting a good acoustic guitar sound can be hard! In this tutorial, we'll take a look at recording the acoustic guitar, one of the most difficult instruments to get right!

Microphone Selection

The first thing to do before you start recording is to select the microphone you'd like to record with. For acoustic guitar, you can do two different techniques: a single, or mono, microphone technique, or a two-microphone, or stereo, technique. What you do is completely up to you and what resources you have available.

For recording acoustic instruments in the highest quality, you'll want to use a condenser microphone rather than a dynamic microphone. Good condenser microphones for acoustic guitar recording include the Oktava MC012 ($200), Groove Tubes GT55 ($250), or the RODE NT1 ($199). The reason you want a condenser microphone rather than a dynamic microphone is very simple; condenser microphones have much better high frequency reproduction and much better transient response, which you need for acoustic instruments. Dynamic microphones, like the SM57, are great for electric guitar amplifiers which don't need as much transient detail. 

Microphone Placement

Take a listen to your acoustic guitar. You'll find that the most low-end build-up is near the sound hole itself; the higher-end buildup will be somewhere around the 12th fret. So let's look at the two types of microphone placement I mentioned earlier. 

Single Microphone Technique 

If using just a single microphone, you'll want to start by placing the microphone at about the 12th fret, about 5 inches back. If that doesn't give you the sound you want, move the mic around; after you record it, you might want to give it extra body by "doubling" the track - recording the same thing again, and hard-panning both left and right.

When using a one-microphone technique, you might find that your guitar sounds lifeless and dull. This is generally fine if you're going to be mixed into a mix with many other elements in stereo, but should be avoided when the acoustic guitar is the primary focus of the mix.

Two-Microphone (Stereo) Techniques

If you have two microphones at your disposal, put one around the 12th fret, and another around the bridge. Hard pan them left and right in your recording software, and record. You should discover that it's got a much more natural and open tone; this is really easy to explain: you have two ears, so when recording with two microphones, it sounds more natural to our brain. You can also try an X/Y configuration at around the 12th fret: place the microphones so that their capsules are on top of each other at a 90 degree angle, facing the guitar. Pan left/right, and you'll find that this gives you a more natural stereo image sometimes.

Using The Pickup

You might want to experiment using the built-in pickup as well, if you've got the inputs to do it. Sometimes taking the acoustic guitar's pickup and blending it with microphones can yield a more detailed sound; however, it's totally up to you, and in most cases, unless it's a good quality pickup, it'll sound out of place on a studio recording. Remember to experiment. Each situation will be different, and if you don't have any microphones to record with, a pickup will do fine.
 
Mixing Acoustic Guitar 

If you're mixing acoustic guitar into a full-band song with other guitars, especially if those guitars are in stereo, you might be better off with a single-mic technique, because a stereo acoustic guitar might introduce too much sonic information into the mix and cause it to become cluttered. If it's just you playing guitar and vocals, a stereo or doubled mono technique will sound the best.

Compressing acoustic guitar is subjecting; a lot of engineers will go both ways. I personally hardly ever compress acoustic guitar, but a lot of engineers do. If you chose to compress, try to very lightly compress it - a ratio of 2:1 or so should do the trick. The acoustic guitar itself is very dynamic, and you don't want to ruin that.

Remember, any of these techniques can apply to other acoustic instruments, too!

Wednesday, April 13, 2011

Audio compressor basics

Compression is a very important aspect of audio production. You need to have an idea of what the audio compressor does and what all those buttons do. Everybody uses it differently and everyone has a method. These methods are created after mastering the tool that compression is.
You can't have a specific method to compression if you don't know how to instinctively use it. You can't only know what one button does and ignore the others. That's no method.
Therefore, let me introduce you to all the typical buttons an audio compressor has. What do they do? How do they interact with each other. When you get a grasp on which button to push, knob to turn or slider to move, you have an easier time getting that sound you want. 

Audio compressor

Basically, compressors compress the audio signal you want to process. Easy right? Well, that doesn't really tell you anything. Compressors even out the audio signal at a certain level, called the threshold and compress the level above at a certain ratio you determine. We push the loud levels lower and therefore have a less dynamic signal.

Now, let's get into all the buttons and sliders and whatnot. As an example, I'm using Logic's Audio Compressor. Any compressor you have will almost certainly have the same buttons.

Logic's compressor

Let's start with the most important parts first. If you have a incredibly basic audio compressor on your hands, chances are you only have these two parameters to work with. Threshold and Ratio. 

Threshold

The threshold determines at what level the compressor starts acting. Say you have a signal that has peaks at around -1dB on the meters of your fader. If you have your threshold at -10, the compressor will start working when your audio starts going over the -10dB threshold. 

Now, if you have a weak signal that never goes over -15dB and you have your compressor on -10dB there's no compression going to take place. Maybe, if you have a swanky cool compressor it will give you a nice color to your sound, but as for actual compression, nada. 

The signal doesn't reach the threshold, and therefore none of the other parameters of the compressor are going to start working. But once that signal goes over your threshold it will get compressed. How much will it get compressed? Well that brings us to our next button.
  
Ratio

The ratio is where you determine how much compression you are going to apply to a signal that goes over your threshold. For every signal that goes over the threshold, it gets compressed according a certain ratio.

Example: For a compressor with a threshold at -10dB and a 3:1 ratio, a nice starting point for vocals. If you have a semi-constant level of the vocal at -1dB it will become compressed so that it only reaches -7dB.

Why?


Because after going over the threshold the vocal reaches its peak 9dB after -10dB, or at -1dB. We take those 9dB and divide them by three, since the ratio is at 3:1. Out of that we get 3dB which we add to the threshold at -10dB. A compression of 6dBs reaching its peak at -7dB. Let's illustrate this with a simple formula:


In this formula you can see the basics of calculating the output of a compressor.

compressor equation

If we take the example above and apply it to this formula, we get this:


compressor in practice


So you see, that if we have a higher ratio, we compress the signal more resulting in less signal coming out of the output. 

Say we have an example of a loud kick drum that's peaking at +4dB but we have a threshold at -20dB and a ratio of 8:1. That's a lot of compression but serves to illustrate a point.

We have a dynamic range of 24 dBs, from -20dB to +4dB. We are compressing everything that goes over -20dB by a ratio of 8:1.


Let's plug those numbers into the equation:
kick drum compression


The highest peaks of the kick drum that are reaching +4dB before are now only reaching -17dB! That 24dB dynamic range we had from -20dB to +4dB has been reduced to 3dB. Talk about over-compression!

After studying these formulas and basics behind the relationship between threshold and ratio, I think we can move on to the next phase of our compressor journey.  

The limiter

A limiter does things a little differently when it comes to the ratio and how it reacts to sounds that go over the threshold. Instead of compressing the peaks that go over the threshold, a limiter simply cuts them off. Which can actually sound better sometimes!

The knee


The knee on the audio compressor has a relationship with the ratio. It applies compression gradually increasing the ratio until a certain point. See the link below for a detailed explanation.

Attack & Release

Every plugin seems to have an attack and release of some sort. And they often don't even mean the same thing. Let's dive into how the attack and release on the audio compressor work.

Attack

The attack, measured in milliseconds, is how fast the compressor starts acting on a signal. With a fast attack the compressor starts working right away on the audio, often dulling the sound of the transient. 

What's a transient? Transients are the first seconds, or attack of the envelope of a signal. Huh? The  first peaks of a signal are called the transients ok? Drums have fast and loud transients !Whack! !Whack! But a cello might have a slower transient, or attack.

By using a fast attack you make the audio compressor chomps down right away on a signal, but with a slower attack time the initial attack, transient or punch gets through before the rest of the signal is compressed. 

In practice:

  • For a punchier kick drum have a slower attack so you get the untreated sound of the beater. But if you want a thumpier and more rounded kick drum, have the attack at a fast setting.
  • If you have a bad bass part and you get a lot of uneven notes jumping out at you, having a fast attack setting can help dull out the unexpected pops from the bass player. You can even put the ratio into limiting by having it at 10:1 or higher if you are dealing with a really troublesome part.

Release

In contrast, release is the parameter that determines, in milliseconds, how long the audio compressor will continue acting on a signal once it goes under the threshold again. If the release is too fast you run the risk of the compressor letting go too early, but if you have the release too slow you can get a pumping effect. This pumping effect is a clear sign of over-compression because the compressor never stops compressing. It is too slow too react, even after the signal has gone under the threshold. 

Thus the compressor compresses the next signal too, even though it is under the set threshold. This can work on some instruments with a slow transient response if you want an even compression..

In practice:


  • Try to make your snare drum breathe by making the release go in time with the track. You can watch the time of the release in the gain reduction meter.
  • A quick release on the kick drum is good since the signal of a kick drum is so short. That way you can be sure that it doesn't continue into the next kick drum hit.

Now that we've covered the basics of the attack and release, let's make our way to the most important tool you have when working these aforementioned parameters.

Gain reduction meter


This is the most important visual meter you have when compressing. It shows you, in dB how much you are really compressing. With it you are able to gauge the effect you are making, both by making sure that your signal is reaching the threshold and also seeing how fast the attack and release are working.

If you don't have the threshold low enough you won't see it working at all, since the audio compressor isn't compressing your signal.

If you have your release too slow you can be sure to see how the meter never really goes down. By taking a visual cue from the GR meter you can tweak the release in time with the track.

Obviously it's good practice to use your ears when compressing, but being able to see the amount of reduction and compression visually is a very effective way in quickly finding the correct sound you are looking for. If you only want to control the peaks, it's easier to see on the GR meter when it is only compressing the peaks instead of trying to listen to the actual audio signal.

Makeup-Gain


Lastly, makeup gain is that last parameter we need to worry about. Since an audio compressor turns down the volume of certain parts of our audio signal, we need a gain knob to increase the average volume to where it was before we started compressing. If we are always compressing around 3dBs we will need to turn the gain up 3dB in order to make up the loss in volume by compressing.
Reference: Gibson, Bill.(2007). Instrument & Vocal Recording. Hal Leonard Books.


focusrite compressor


Buss compression


drum compressionYou can crank up the sound of your drums by using buss compression in your tracks. 

By using parallel compression underneath the dynamic drum tracks you can create a larger than life sound.


Multiband compression


Multiband compression is used for many purposes, and can be a handy tool for mastering your tracks. By using multiband compression you can define the specific frequency areas you want to compress, using different compression values on separate areas of the frequency spectrum. 

Conclusion

Now that we've gone through the knobs you can find on your typical audio compressor you are all set to start compressing. If you need further tips on compressing, or want to share your cool compression tips, please share it with the rest of us here below. Everybody is always looking to enhance their understanding of compression.

Tuesday, April 12, 2011

Ultimate Guide for Mixing Drums

Get a great sound from your acoustic drums. 


Your drum sound is one of the most important aspects of your mix. Mixing drums is therefore a number one priority for laying that solid foundation to your tracks, guaranteeing you a solid rhythm section.

Drums can be one of the most problematic instruments to get right in a mix. The complexity of recording drums is equally complex when it comes time to mix them.
If you did a great job recording the drum kit, then mixing your drums can only be a pleasurable experience.

But where to start?

Kick Drum Sound

Mixing drums starts with the foundation of the kick drum. The sound of the kick drum, along with the snare will be the defining factors of your drum sound. If you leave the kick drum sounding bad, the whole foundation of the song will lose its footing. The kick drum needs to be tight and punchy, with enough low end to fill up the bass range and enough mids to cut through the mix.

EQ

mixing kick drumIt's important to emphasize the low end of the kick with EQ. If you feel there isn't enough bass to your kick drum, a low shelving boost around 80 – 100 Hz normally does the trick.
A boomy kick drum can also cloud up the clarity of your kick drum sound, so it's normally a good idea to cut around 200 – 250 Hz if you feel there is too much muddiness in your kick drum sound. A boxy kick drum sound is also a common nuisance, which can be fixed with Eq'ing out the boxiness that resides in the aread around 300 – 600Hz or so.
If your kick drum is all thump and no snap then we need to bring out the sound of the beater. We can usually find it around the 2 – 4 Khz area. Depending on the genre of the song, and the type of beater used, different frequency boosts in the beater area generate different sounds. A boost at 2.5 Khz is more of a typical rock sound as opposed to a narrower boost at around 4 Khz, which results in a Hardcore Metal type snap.

Compression

When mixing drums, along with everything else, using compression is a subjective subject and everyone has an opinion on how things should be compressed. That said, there are a few guidelines you can follow to get a steadier kick drum sound.

How much gain reduction you want from the compressor depends on the genre, the steadiness of the drummer and the feel of the song. I usually start with a ratio of 4:1 or 6:1 and lower the threshold down until I'm compressing around 6dBs.

Then I adjust the attack and release depending on what sort of sound I want. A fast attack clamps down on the transient of the kick drum, dulling the initial attack down somewhat, but a slower attack lets the attack of the beater break through before the compressor starts working.

I try to time the release in time with the beat, so that the compressor has stopped compressing before the next hit. It's easy to do this in modern DAWs because you are able to see the gain reduction meter working, enabling you to tweak the release perfectly in sync with the song.

Snare drum sound

Partner in crime with the kick drum, the snare drum is the other defining rhythmic factor to the song. “It's all about the snare” an experienced engineer once told me, because it's what supplies the song with that steady backbeat. Since it's such an important aspect of mixing drums, there needs to be a lot of care taken with getting the best sound possible.

EQualization

snare drum soundEQ-wise, there is not an awful lot you need below 100 Hz, so you can start by high-pass filtering all the low end away.
The body of the snare can be brought forward with a little boost at around 150Hz, if you feel like it's lacking some thickness.
I like thick snares so I often catch myself adding a little weight to the snare around that area.
If your snare has ringing frequencies that you find annoying you can try pinpointing them by boosting a specific frequency band with a high Q and sweeping the spectrum until they pop out. I find that sometimes the snare needs a little cut in the mids, either resulting from boxiness at 500 – 800 Hz or too much of a nasally attack from the area around 1 Khz. Enhance the attack of the snare with a broad boost around 2 – 4 Khz and search for the sizzle of the snares in the higher frequencies.

Compression

Like I do with the bass drum, I try to make the snare compress in time with the song. By timing the attack and release I can get a nice steady snare sound that breathes with each hit. I normally leave the attack at a medium to slow setting so that the snap of the snare is unaffected, and time the release so that it stops compressing just in time for the next hit.

I start with a ratio of 3:1, often going way higher as it depends on the genre how hard I want the compressor to be pumping. You can adjust the threshold so that it is only lightly compressing the peaks for a subtle sound, or you can push the threshold down harder for a heavily compressed sound.

Snare compression is perhaps one of the most argued about subjects in audio production. Every engineer has a certain method to mixing drums, and I think it's up to you to experiment and get acquainted with the knobs and sliders on your audio compressor so that you can create the sound that you want.

Reverb

You can create a completely different snare sound by just applying an interesting reverb to it. Whether that's a rock arena reverb, subdued room or even a spring reverb, different reverbs can transform the sound of your snare drum.

Go through your reverbs and see what type of reverb sounds best with the song you're mixing. Are you going to add a bright plate reverb to make it stand out, or will you be mixing it into a specific room with a small room sound? If you are in a particularly adventurous mood, you can try adding some gated reverb to your snare.

Mixing the toms

EQualization

mixing drums tomsIf the toms are playing a big part in your drum sound, mixing them so that they sound punchy and powerful is crucial to a great drum sound.
Get them punchy with EQ. The best way to EQ toms is to find the unflattering frequencies with your equalizer. Normally, these are the middle frequencies, from 300 – 800 Khz or so.
Find the boxy and unwanted frequencies, cut them out and then add low end power and high end punch as needed.
When mixing drums like toms, sometimes you need to  finely cut a few adjacent frequencies instead of scooping out a big portion of the frequency spectrum.

Compression

By adding a generous amount of compression to your toms you can get a larger than life sound out of them. You can fatten them up considerably with some tight compression, and with the addition of a little reverb you can make them sound huge and powerful. If that's what you want to go for. The same rule of subtle compression applies as well to toms if you only want to control the peaks and lightly color their signal.

Overheads

The overheads might be the most important microphones on the kit. The overheads are the microphones that are supposed to pick up every drum and give a complete sound to your drum kit. There are two ways of mixing drums with the overheads; you can either use them as the primary sound, sculpting every drum around the overhead sound or you can use them to primarily accent the cymbals and air around the kit.

overhead mixing

By adding the overheads to the mix early on, you can get a better sense of the full sound of the kit, making your drum mixing easier. Just notice how different a snare drum microphone sounds compared to a snare that's coming from the overhead mics.
By adjusting the overheads with the rest of the close miked drums you can get a different sound. By focusing on the overheads you can get a roomier sound, but if you want a close in-your-face drum sound you would rather use the overheads as complimentary to the rest of the drums, mainly using them to accent the cymbal sounds.

The Hi-Hat

Mixing drums is a selective process, meaning that certain elements of the drum-kit only need specific frequency ranges. You only need a specific frequency range from the hi-hat. Considering that the hi-hat microphone is probably picking up a lot of bleed from other drums, some heavy high-pass filtering is in order. Filter up to 250 Hz at least, even higher if you feel that you aren't losing anything from the hi-hat sound with higher filtering.

Now if you feel that there is something lacking from the hi-hat, or that you want to bring out the gong sound, you can find it in the 200 Hz area. So if your hi-hat needs a little more gong to it, you will have to sacrifice that aggressive filtering. Like everything else, just filter until you start hearing the sound becoming compromised and then back off a little bit.

Cutting at 1Khz can reduce the cheap jangly sound from the hi-hat, but you can enhance and give it some sparkle with a boost from 7 Khz or so. Use a high shelving EQ if you want to enhance the high end with some air, but a parametric bell EQ if you just want to accent a specific frequency area. 

Room mics 

Room microphones give a different sound to the drum kit than the regular overhead mics. Due to the distant miking technique most room mics are recorded with, we get a full sound of the drum-kit as well as a great amount of the reverb of the room it was recorded in. Which, depending on the sound of the room, can either sound amazing or horrible.

mixing drums
Mixing Drums With a Roomy Sound
But let's assume our recording room is great. With a nice room mic picking up the complete kit we can try a few different techniques. We can apply some heavy compression to the room mics to get an even punchier sound. We can EQ the kit as to draw out the most important elements, such as kick and snare and we can add it underneath an already great drum sound for that final touch.

Mixing drums into a room

If the drums weren't recorded in a nice sounding room and sound quite dead when they come from the recording stage, it's time to add some space to our drum tracks.

A good way to add some ambience to our drum tracks is to add a 0.5 second drum room reverb. You can add a a nice amount to the overhead tracks, and maybe even a slightly different reverb to the snare to make it stand out. Go through your reverbs to try to find the best sound to your particular track.
Mixing drums – Drum Replacement

If you have ended up with badly recorded drums that you can't get even get close to a good sound out of, maybe it's time to look elsewhere. Drum replacement is a great way of mixing drums in order to keep the dynamics of a real performance with the sound quality of amazing sounding drum samples. Audio recording software such as Pro Tools and Logic Pro have great drum replacement options when you are stuck with crappy sounding drum tracks.

Conclusion

Mixing drums is a challenging but enjoyable aspect of audio production. Since there are so many different ways of getting the drums to sound with EQ, compression and other mixing tricks there is no actual right way of mixing drums.

The only solid piece of advice I can give you for mixing drums is to experiment with all the tools you have on hand. Get every element to sound as good as possible and then try to mold them together to make them sound like a complete whole.

As always, there are trends in the music industry as to what sounds good right now, but being able to get whatever sound you want, whether it's huge 80's toms or a 90's arena rock snare is an important aspect of being a well rounded mixing engineer.